The information contained in this article is not intended as legal advice and may no longer be accurate due to changes in the law. Consult NHMA's legal services or your municipal attorney.
Now that you have downloaded data from NHMA’s Wage Data (see the May/June 2026 issue), let’s discuss how we can work with the data so it will help us accomplish our needs.
The first thing I do when opening an exported dataset is to do some quick formatting to easily review what is in the file. Let’s start by resizing the column widths so we can see what they contain. Highlight each column with data in them – my export has data in columns A – H. To highlight them, I left click and hold in the cell that shows the A then drag the mouse over to column H. If you want to include additional columns to be sure you have everything, go for it.

Now bring your mouse to any of the vertical lines between two of the highlighted columns until your icon turns into a vertical line with arrows pointing both left and right. Once you have that icon, double click the left mouse button. All highlighted columns will resize to the maximum width needed for all the cells within said column. (With that same icon, you can click and drag left or right so all highlighted columns will resize to the same size as the one you are adjusting.)
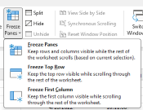
With the data in the columns visible, we can see there is a row at the top that has headers. Because I can be forgetful, I might not remember the title descriptions in each column, so I like to freeze that row in place. The freeze option is found on the View tab of your ribbon in the Window section. Excel allows you to freeze data at the top of the screen, the left of the screen, or both. Because I want to see the header row, as well as the Organization and Role columns, I am going to click in cell C2. Once there, click on the Freeze Panes icon in the ribbon and select Freeze Panes. You will now see a solid line running across the screen (including between two row numbers) and down the screen (including between two letters). This is the visual as to where your screen is frozen. When you scroll down or to the right, the top line and two left columns will not scroll off the screen.
When I glance at the data, I can see there are dollar amounts in the minimum and maximum columns. In looking at what exported, the accounting part of my brain goes into freak mode because of the lack of formatting in those two columns. To forestall that portion of my brain from completely shutting down, I quickly highlight those two columns. On the ribbon, go back to the Home tab and review the options in the Number section. I find that dollar signs at the beginning of each cell to be overwhelming, so I typically opt for the comma feature. This option will make each cell have two decimal points and place a comma where necessary.
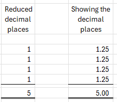
**Tangent** (or Tam-gent as it has been suggested I call it.) As long as we are discussing this section, let me go on a very quick tangent and explain the two icons with arrows and zeros. The icon with an arrow pointing to the left will increase the number of decimal places while the icon with an arrow pointing to the right will decrease the number of decimal places. Excel will automatically round the number it displays as necessary when the decimal places are reduced. Be very careful when using this feature as any formulas are based on the actual number and not the displayed number. See the example below.
Here is a quick navigation tip. If I export the entire wage data set, I end up with 3,554 rows in information. Very few of the rows have something in the notes fields. If you wish to navigate quickly to the first field that has something in it, click in any of the blank cells in the Notes column. On the keyboard tap the End button then the down arrow button. Excel will automatically reposition you to the first field that has data in it. The reverse is also true. If you are on a field with data on it, tapping the End button then any of the arrow buttons will move you to the first field in that direction that does not have data in it.
When you save this export file, it will default to wanting to save as a CSV file because that is what opened. You may want to consider saving it as an Excel Workbook (.XLSX) file so the formatting will be retained.